BYOD: The fun begins with MAM!


What is a BYOD device?
Bring-your-own-device is a personally owned device, where an employee logs in with a local user and accesses corporate resources with their Entra ID login.
It’s important to say that a BYOD device is not only a Windows device, but it can also be devices such as tablets, smartphones, desktops, and other laptops. We will focus on Windows devices in this blog.
The situation with BYOD devices
Have you tried to log into a tenant, and asked yourself “Where do these Entra ID registered devices come from?”. I have certainly been there!
What typically happens, when a user logs into Outlook or another Office app on their personally owned device, is that the user aren’t attentive to what they say yes to, so when they have successfully logged in, they will get the following screen.
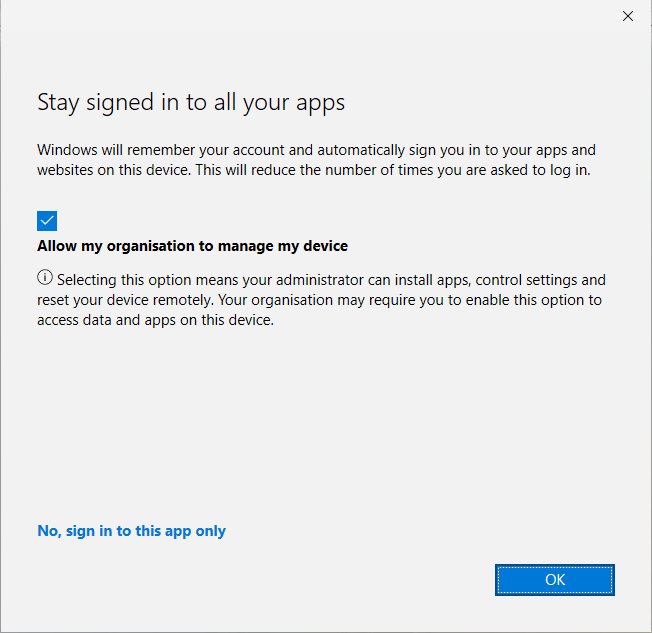
When pressing OK, they will allow the organisation to manage the device, in simpler terms, the device will be registered in Entra ID and enrolled in Intune.
What is MAM for Windows?
MAM for Windows is Mobile Application Management, now what does that mean? Remember that we talked earlier about personally-owned and BYOD devices? MAM is a solution for these devices, so we can control and secure company data on application level, without enrolling the device with MDM.
What is the difference between MAM and MDM, you may ask? MDM focuses on the device, and MAM only focuses on managing the applications on a device.
Enough talking! Let’s get hands-on MAM!
We have a scenario where it’s been decided by the IT department that whenever a user accesses Office applications on a personal or BYOD device, there should be an app protection policy in place to protect the data.
Block for personally-owned devices
The first step is to block personally-owned devices in Intune. This can be done with “Enrollment device platform restrictions”, head to Intune.microsoft.com -> Devices -> Enroll Devices -> Enrollment device platform restrictions.
Here, you can see that there is already a default restriction that is assigned to all devices. If you create a new restriction, the default restriction will have the lowest priority. We will just modify the default policy and make sure personally-owned Windows MDM is blocked.

When you have successfully blocked personally-owned devices, we have to head to the next step!
Connect Mobile Threat Defense connector
Before all of this work, we have to add the ‘Mobile Threat Defense’ connector in Intune. Head to the Intune admin center, select Tenant Administration and Connectors and Tokens, and lastly, select Mobile Threat Defense under the ‘Cross Platform’ category.
Press add and make sure to select ‘Windows Security Center’.
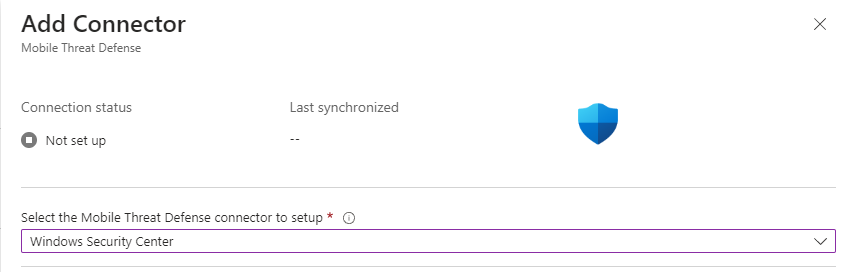
Before you are finished with this, click create, and the connection will begin to set up.
You don’t have to be concerned that the status doesn’t change, it will change once you have the first device enrolled with MAM.
Next up — App Protection Policy!
Head to the ‘Apps’ section in Intune and select ‘App protection policies’. Create a new policy, and make sure to select Windows. Now give the policy a name and hit Next!
The only app that is available at the time of writing this blog is Microsoft Edge, so make sure to select Edge.
Next up is ‘Data Protection’. Now, we would have to define how strict we want the policy to be. If you are in doubt about what a specific setting means, hold your mouse on the little ‘i’ icon.
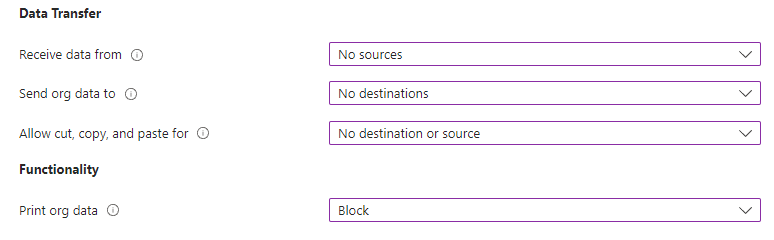
I have chosen the settings above for testing purposes, and I will press next.
‘Health checks’ give us an opportunity to define what we would like to do based on ‘App Conditions’ and ‘Device Conditions’.
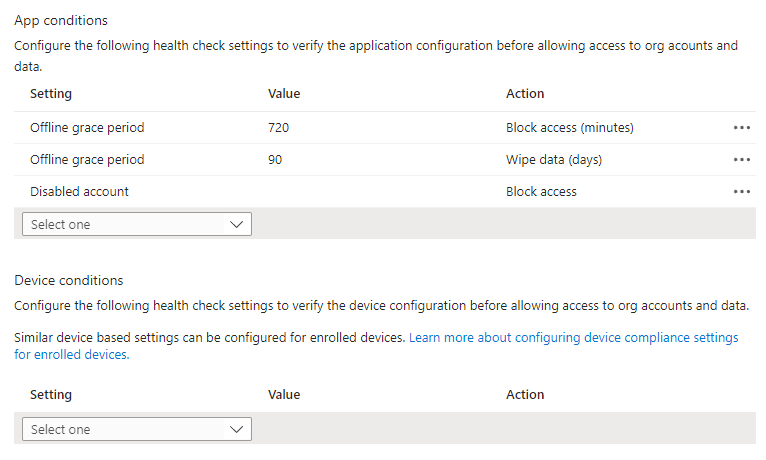
I have left the two default settings in place and added ‘Disabled account’ so we can make sure that access will be blocked if the account gets disabled.
Last but not least, we have to include a group in this policy. My advice would be to target all users because it will only be applied to personal devices.
Conditional Access — here we go!
Run to Conditional Access, and head down to ‘Policies’. Create your new policy and give it a name you like. For the users, I have created a test group and included it.
NOTE: Remember to exclude admin accounts, if you wish to include all users! Always test with a few users, before production.
Next under ‘target resources’ include Office 365.
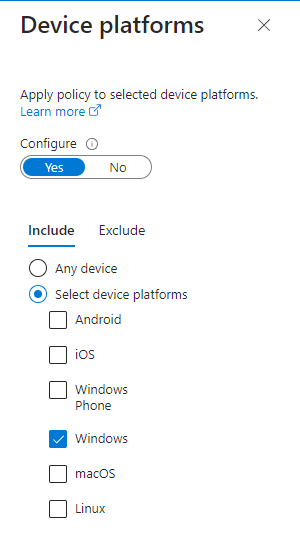
We have three conditions that we have to configure. Start with ‘device platforms’, and include Windows devices.
‘Client apps’ are the next one, and it’s important here that you include Browser. The last condition is ‘Filter for devices’ I have chosen to configure my filters, so I include all that isn’t equal to Microsoft Entra Joined or Microsoft Entra hybrid joined.
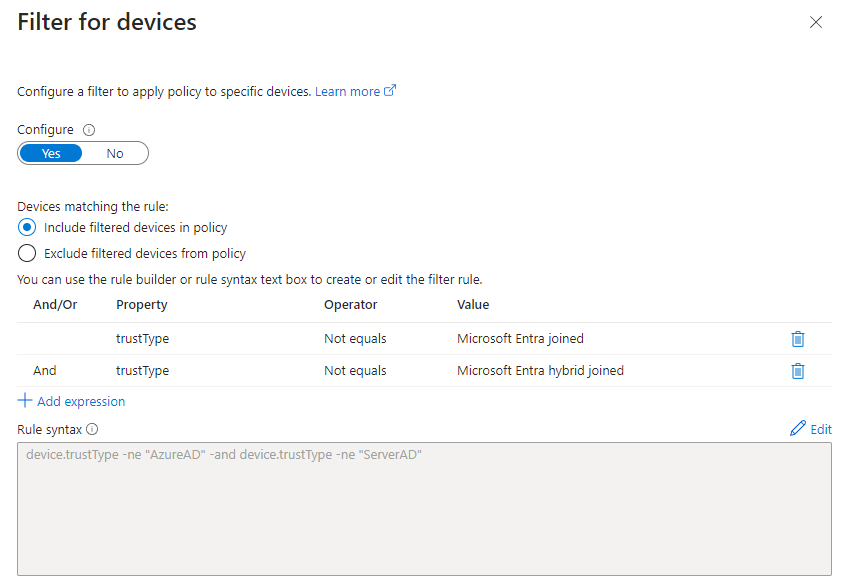
You will see later on when we enroll our devices with MAM, that they’re enrolled as Microsoft Entra registered.
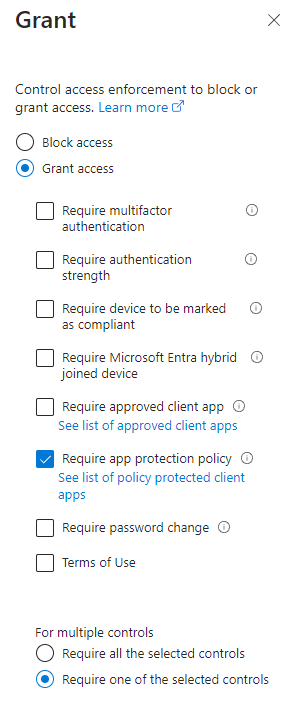
Under ‘Access Controls’, we would like to grant access and ‘require an app protection policy’.
The last setting, we have to configure is ‘Session’. We would like to put extra security on top and use ‘Conditional Access App Control’ and block downloads.

It’s testing time! Let’s see it in action.
Enrollment process
Spin up a test PC or virtual machine so we can test our settings. It’s important that the device isn’t enrolled in Intune. Let’s start with portal.office.com and try to log in.
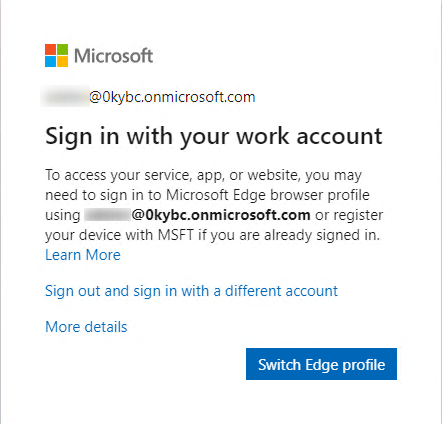
I have logged in, and it’s giving me this prompt. Press ‘Switch Edge profile’, and select ‘Sign in to sync data’. It will prompt you again with your Entra ID login, and we will now see the well-known ‘Stay signed in to all your apps’.
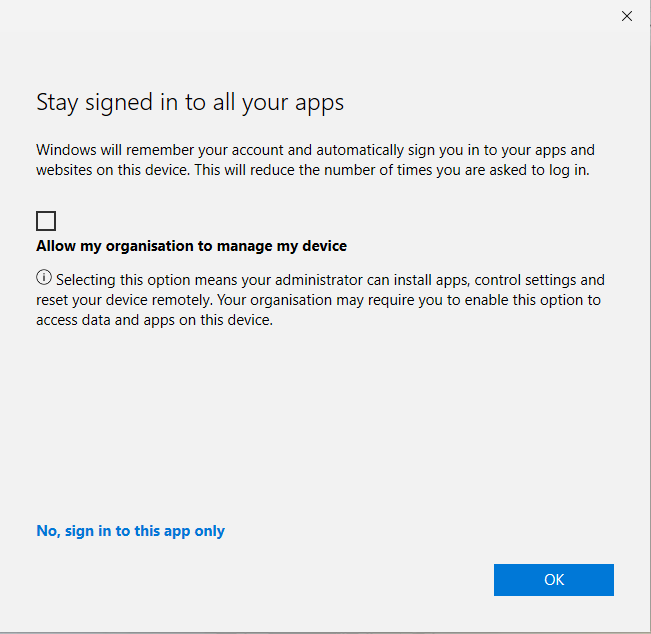
The most important thing here is to uncheck ‘Allow my organisation to manage my device’ otherwise, your device is enrolled with MDM instead of MAM. Uncheck the option and press OK.
We will now see some good signs that our device is enrolled with MAM. Take a look at the top of your browser, it’s mentioning MAM enrollment.

Let’s get back on track, and press continue to ‘Let’s set up your profile to access org resources’.
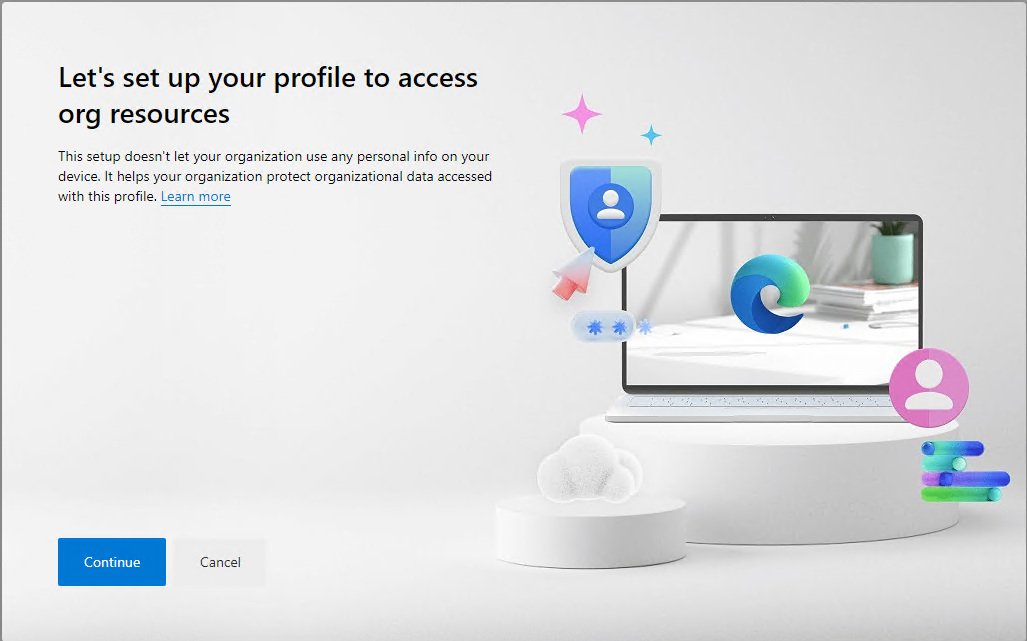
When that’s done, we will get back into the Microsoft portal with our new work profile in Edge.
Let's test our App Protection Policy
I have created a new document, which I would like to do some testing on. I will try to copy content in and out of this document to see what happens.
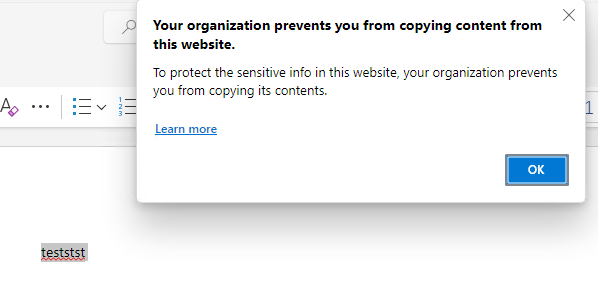
Luckily for us! It will block as soon as I copy the content outside the document.
Observations
When you are enrolling the device with MAM, you will notice in the user ‘AppData\Local\Microsoft\Edge\User Data\’ that there have been created two new files. I have marked them on the screenshot.
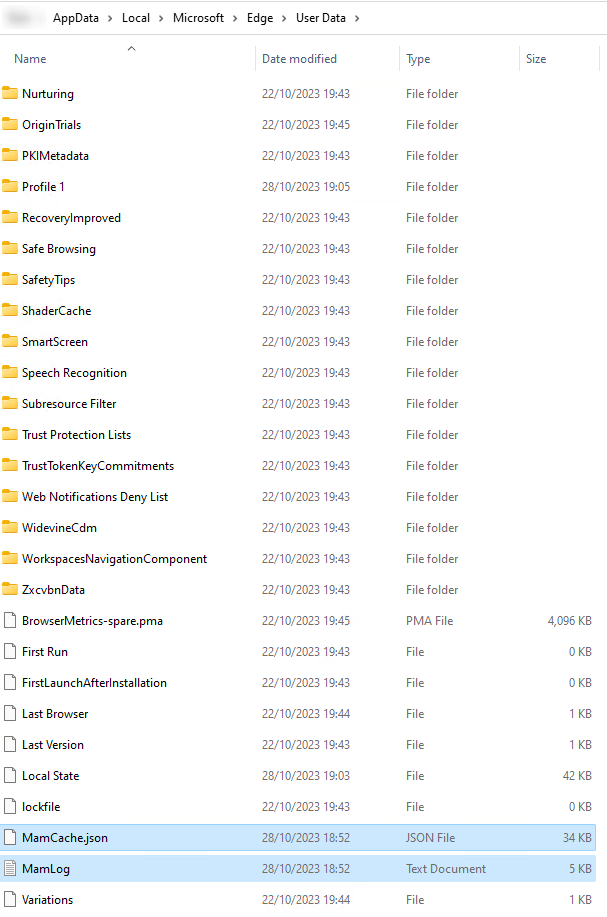
The Mamlog can help with troubleshooting if you are having issues with MAM enrollment.
If you have issues with your App Protection Policy, you can check on the client to see if it has been applied to the work profile in Edge. Browse to this location: edge://edge-dlp-internals/.
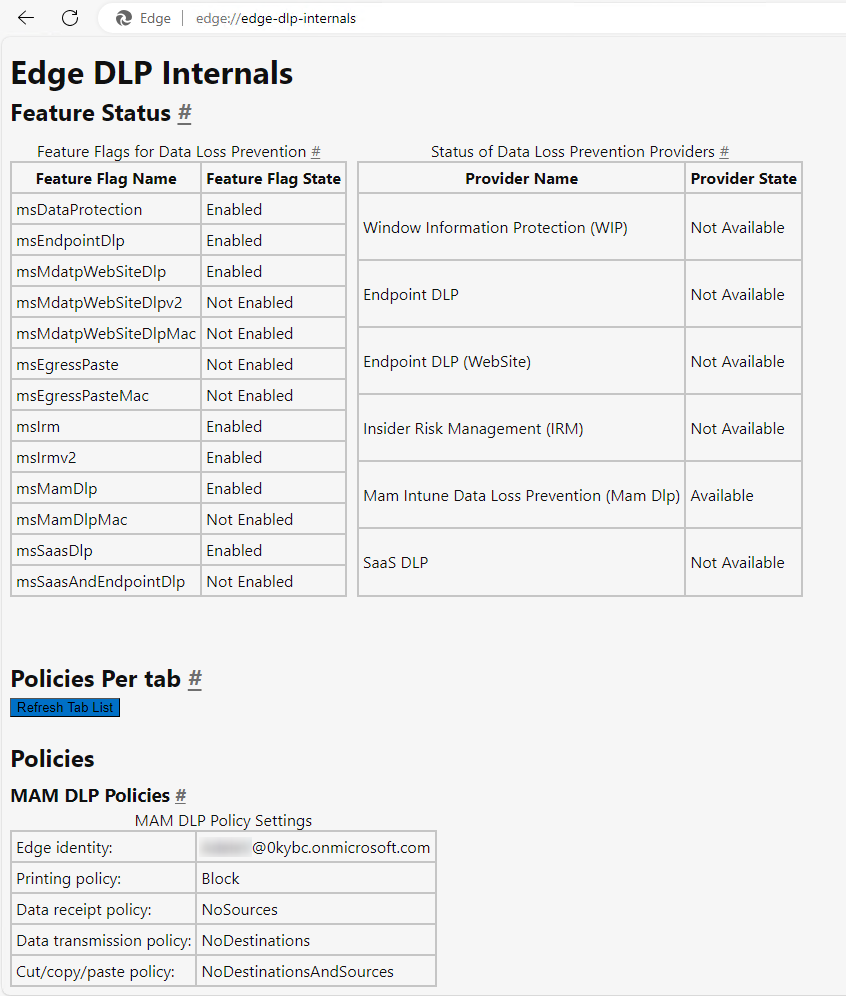
From this view, can we see that our app protection policy is correctly applied.
Conclusion
I have struggled with MAM for Windows, so it will be a mini-series where I will give you all my experiences and tips that I have found helpful and learned along the way.
Thanks for reading!