Deploy your first app with Intune!


Introduction
We have enrolled our first device in Intune, and now it’s time for the next step in our beginning with Intune! Can you guess what it is? We are going to deploy our first app.
There are several ways to deploy an app with Intune, whether you are deploying an app to Windows, iOS, Android, or macOS.
In this blog, we will focus on deploying your first “Win32” app in Intune.
Why should I deploy a Win32 app?
There are many benefits to deploying a Win32 app. You can think of the Win32 app as an all-rounder! Some of the installation methods you can use are PowerShell and batch scripts, that’s pretty cool. If you like it a bit easier, you can also just use an MSI or EXE file.
There are some nice tools out there, such as PSAppDeployToolkit (PSADT). PSAppDeployToolkit is really useful for deploying applications, and if you enjoy PowerShell, you should definitely take a look!
The last benefit I would like to point out is the control you have with Win32 apps. You can control the requirements, such as the minimum OS version and whether the device should be 64-bit or 32-bit, or maybe both. You have the option to manually configure detection rules or even build your own!
There are many benefits to Win32 apps, and these are only some of them.
Let’s get started with the first app!
Wait a bit! Before we can get started, there are some prerequisites we have to go through. First, you have to identify which app you would like to deploy.
I will deploy Firefox, so I go ahead and download the MSI file and put it in a folder on my PC.
The other prerequisite is to install the “Microsoft Win32 Content Prep Tool”.
You might think, why is the prep tool necessary? The tool is used to convert the application files into the .intunewin extension and make them ready to upload to Intune. Another benefit is that it also detects the install and uninstall commands — this will be helpful later.
Wrap the MSI
Before we can start uploading it to Intune, we would have to wrap the MSI file to a .intunewin file. Head into the IntuneWinAppUtil.exe and open it, as I have done below:
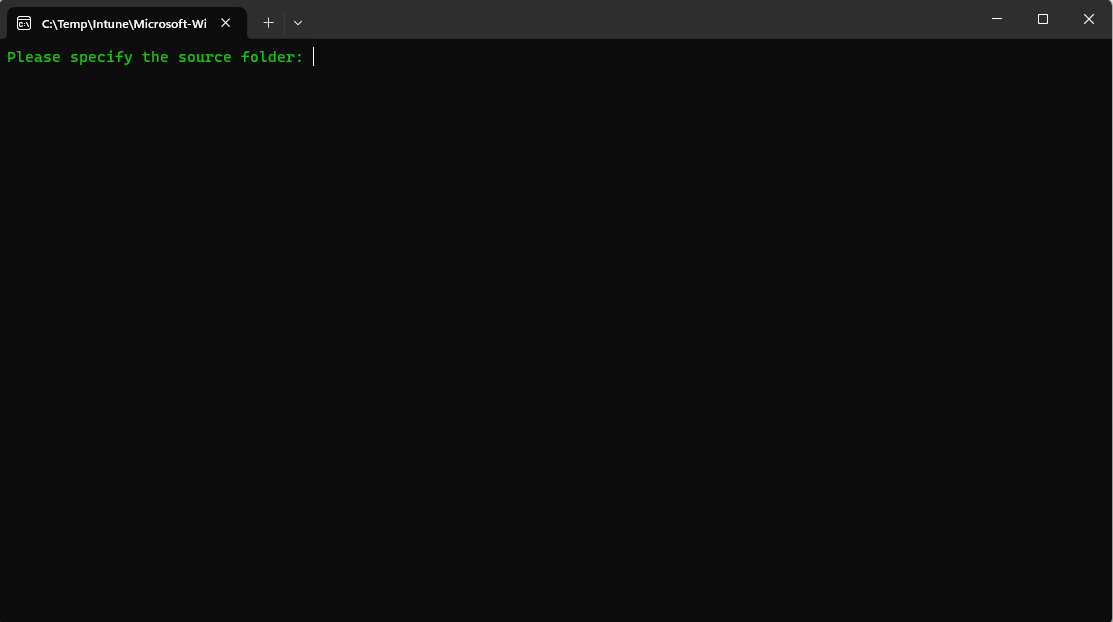
The source folder is where the MSI file is stored, so let’s copy that path into the prompt and hit ENTER. Next is the setup file, which is the MSI file itself.
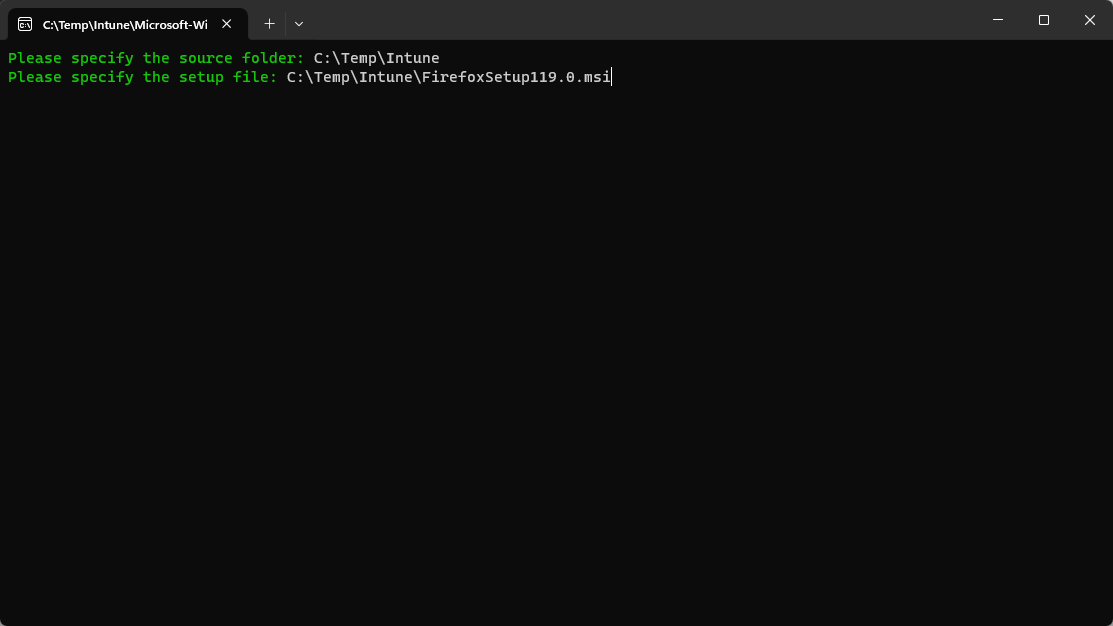
Last but not least, we have to select the output folder. I will just select the same as my source folder and ENTER.
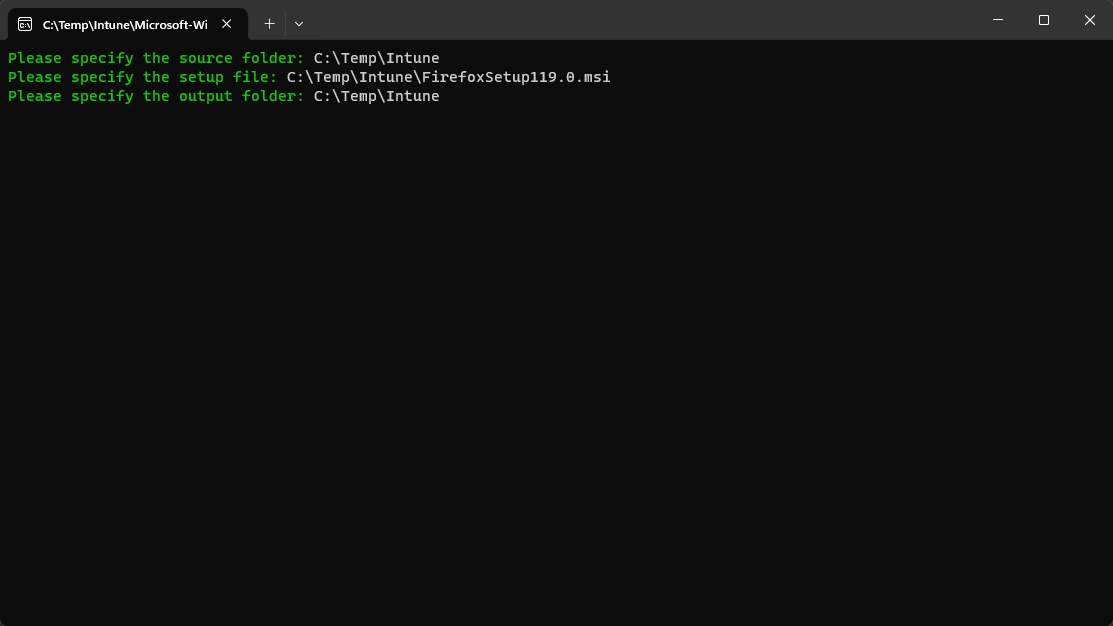
It will now ask me to specify the catalog folder, in this case, I will just type “N” and hit ENTER. It will now encrypt the data and collect it within a .intunewin file in your output folder.
Next up, let’s upload it to Intune!
Go to the magic Intune portal and head to Apps. You can from here select by platform, but also the “All apps” option.
Hit the add button, scroll down to the category other, and select “Windows app (Win32)”.
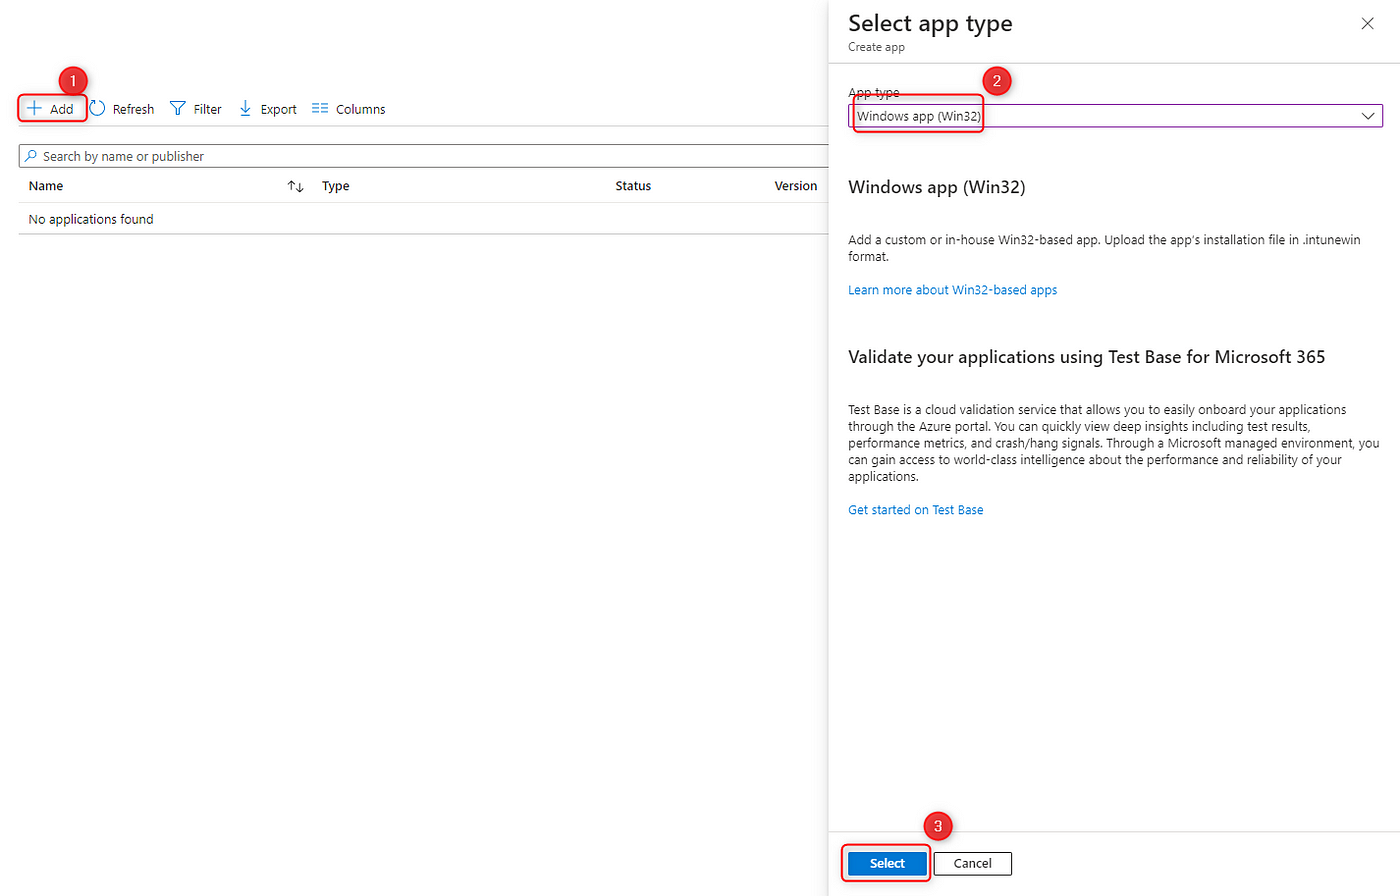
You would now have to select the .intunewin file that you created earlier and press OK.
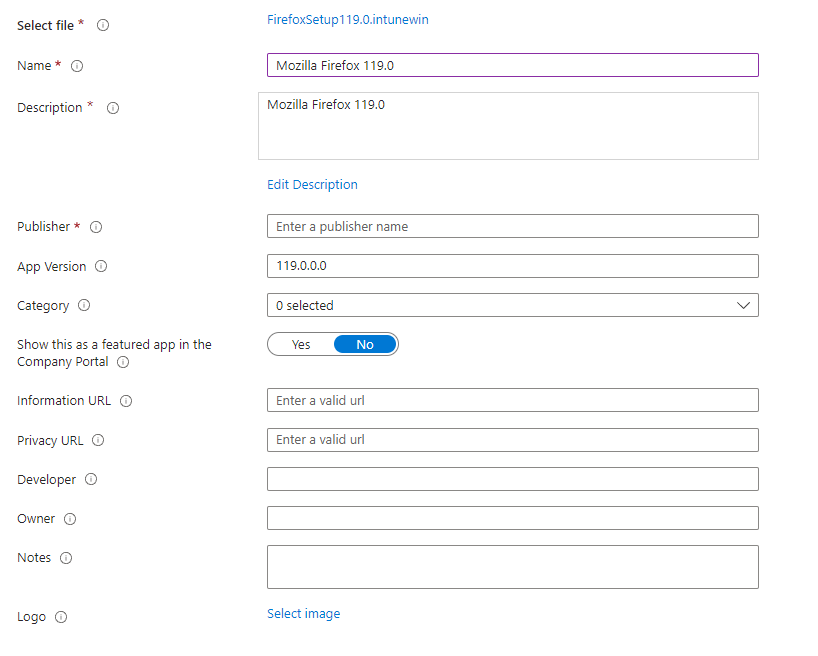
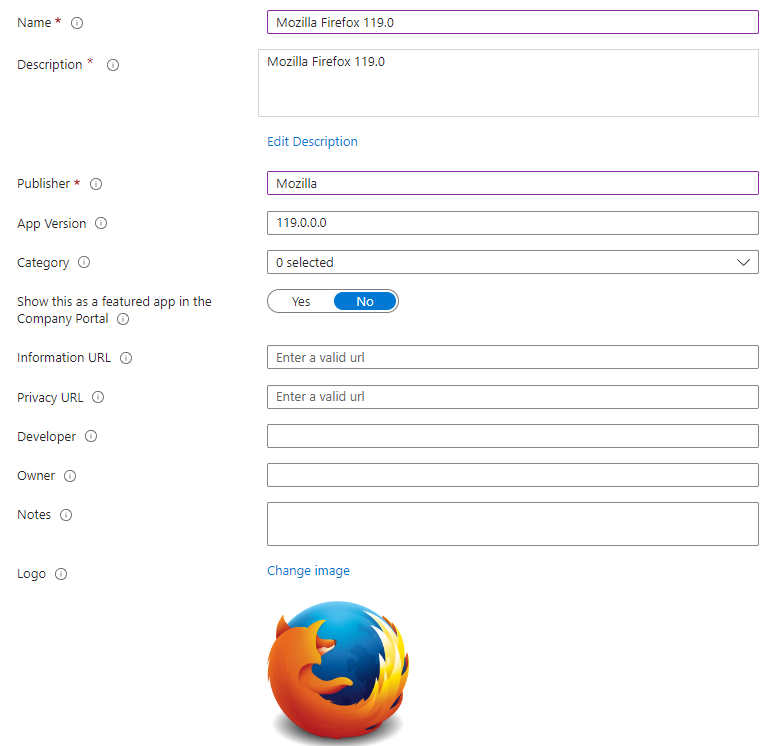
Once you have selected the .intunewin file, you will be presented with the above screen. It has auto-filled out the name and description, we just have to fill out the publisher and find a cool logo for the application.
Hit the next button, and let’s take a look at the program page. I have been so lucky that it has been auto-filled for me!
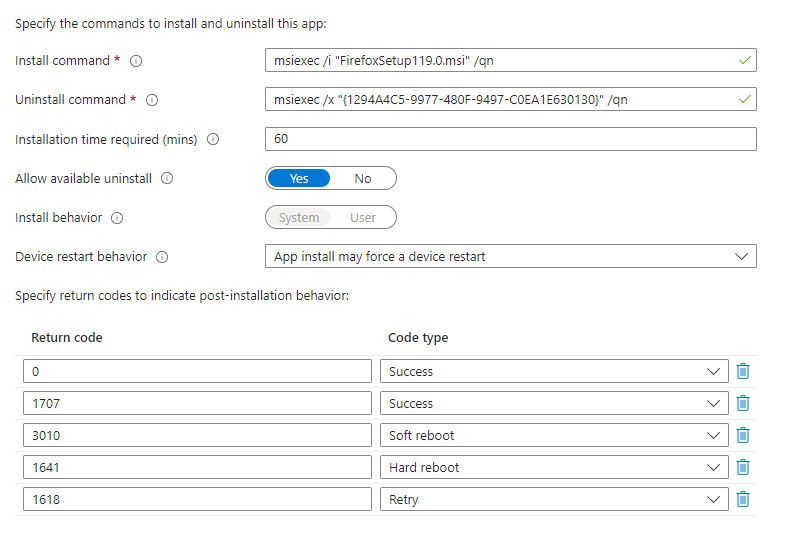
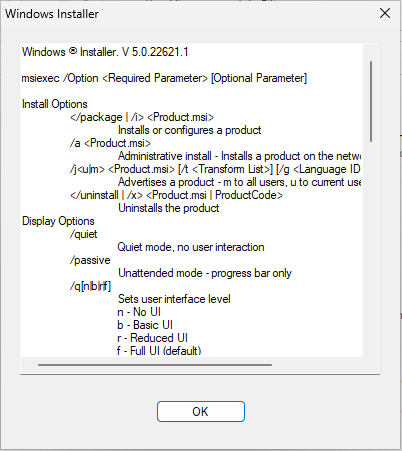
What do these install and uninstall commands mean? Let me give you a hint: Try to search “msiexec” on your PC and hit ENTER. This little pop-up will give you more information about what these commands would do.
If we take a look at my install and uninstall commands, the /i mean normal installation, and with /qn at the end, it will be a quiet installation without any installation UI.
A short explanation of the uninstall command is that /x will mean uninstallation. The uninstallation will look at the product code GUID and uninstall quietly.
Back on track, we can specify the installation time and if we would like to allow uninstallation from the company portal. We won’t change any of these for our application, so go to the next page! On the requirement page, we have to specify the OS architecture and minimum OS version. I will select 64-bit and demand that users have Windows 10 20H2 as a minimum.
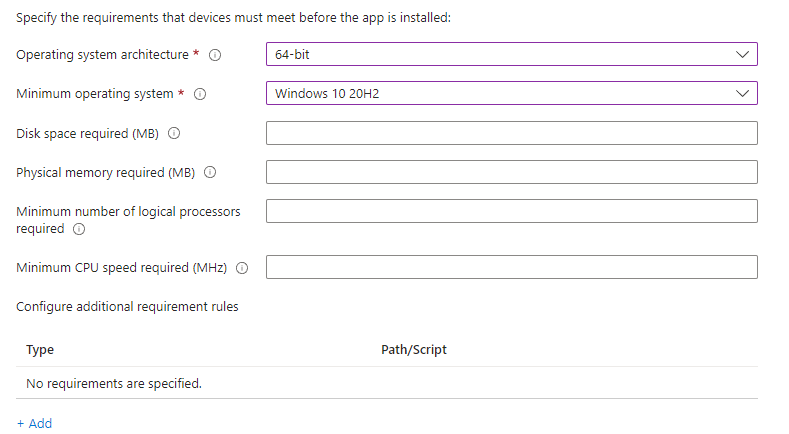
Detection rules are next up. Detection rules are used to detect if the application is on the device or not. If the application is detected, Intune won’t install the application, and vice versa.
I will configure a manual detection rule, and I want it to detect on File. I have copied the information, as shown below, into the detection rule.
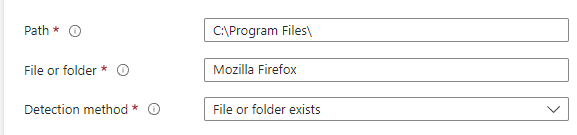
I will make sure to press OK. If the folder “Mozilla Firefox” is detected on my devices, it will not install Firefox.
The dependencies and supersedence aren’t necessary for my app, so I will head to assignments. I will cover the other two in another blog!
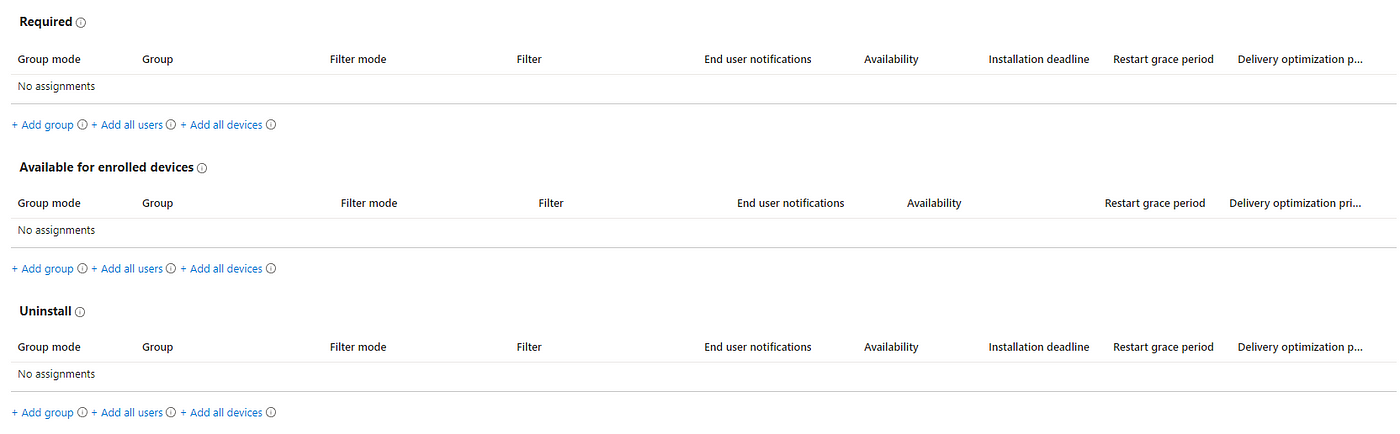
We have three options for the assignments, as you can see above. When you select “Required” it will automatically install on your devices. If you select “Available for enrolled devices”, the app will be available within the desktop and web versions of the company portal.
Last but not least, if you select “Uninstall” it will uninstall the app from the devices that you have assigned.
I will force the app to install on all my devices, so I will select “Add all devices”. Select next and create, the app will now be created.
It’s always recommended to test your application before deploying it to all users, in my case, I only have one device enrolled.
No app deployment, without testing it!
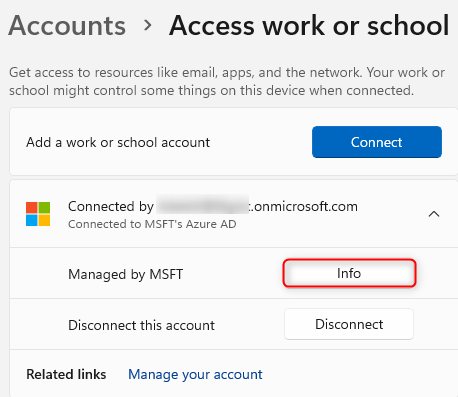
Spin up a VM or a test PC so we can see if our app is installed correctly. Login to your device and start the synchronization so the device will retrieve new policies.
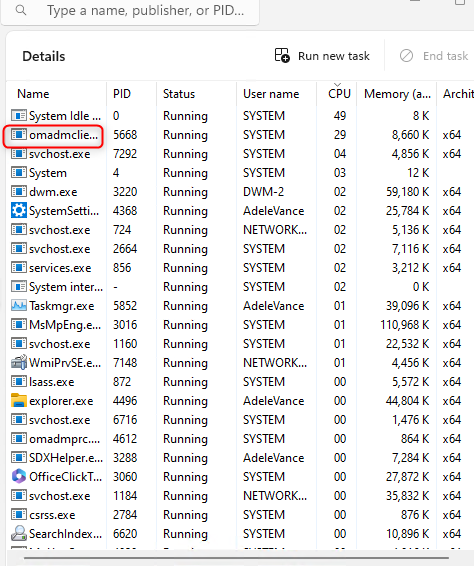
You can start the synchronization by searching for “Access work & school” on the PC and selecting “Info” underneath the account.
Scroll down on the page and press the sync button, and it will start the synchronization. You can see the process starting if you open Task Manager and select details. Keep an eye out for “omadmclient.exe”
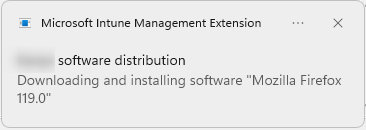
After a while, you will now see the below notification that your device is installing your application.
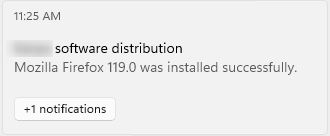
Once it’s finished installing, you will see the other notification, and hopefully, it will be successful.
If you are experiencing that your application isn’t installing successfully, you can view the IntuneManagementExtension log file within this location: “C:\ProgramData\Microsoft\IntuneManagementExtension\Logs\IntuneManagementExtension.log”
Conclusion
This is the next chapter at the beginning of your Intune journey. If you haven’t read the first blog about enrolling your first device in Intune, you can take a look by clicking here.
Thanks for reading!