Exploring Identity Access Management in Entra ID: A Beginner’s Journey

Introduction to Conditional Access
Have you ever wondered what Conditional Access is? Conditional Access is like an if statement. If a user wants access to corporate resources, then they must authenticate with Multi-Factor Authentication.
I can try to explain it in another way that many of us might understand.
Signal
Conditional Access works the same way as when you are entering a bar. The bouncer needs to see your ID to clarify who you are and if you are old enough. In a technical sense, your ID could be the user, device, or location.
Decision
Bars have rules about age that visitors must comply with. The same applies to users when accessing corporate resources. These rules could involve the device being compliant, verifying with Multi-Factor Authentication (App with number matching), or the user might need to change the password before access is granted. These are only a few of the rules.
Enforcement
There are 2 options for users when trying to access corporate resources: they can either be allowed through or blocked. Depending on the Conditional Access policy, if there is a policy that requires MFA for targeted users. Where we have configured user risk with a risk level on high. A brief explanation of user risk. User risk is calculated by an AI, that uses many signals to determine your user risk level. An example of a user risk detection is “Leaked Credentials”. Microsoft has a service that checks user credentials on the dark web and matches it against user credentials in Azure AD.
When the user risk level is high it will require a password change, before the password change is possible, the user will be required to verify with MFA.
Wow! That was a lot of information to start with, but it will be much more exciting as we go!
License Requirements
Conditional Access doesn’t come with all licenses, so you would have to at least have the Microsoft Entra ID Premium P1 license (former Azure AD Premium P1). The feature is also included in licenses such as Microsoft 365 Business Premium, EMS E3, and E5.
Why is Conditional Access Important?
Conditional Access is extremely important because it helps protect corporate resources and reduces the risk of unauthorized access. Security can possibly be a hassle for the user, but with Conditional Access that isn’t the case.
Conditional Access is the first defense mechanism in a modern setup. A lot of applications such as VPN, are authenticating with Entra ID. There are several rules that you can set up for your policies. For example, users must verify with Multi-Factor Authentication, and the device must be compliant before it can access corporate resources.
It’s possible to set up policies from scratch or with a template. Microsoft has made templates that make it easy to deploy.
Signal, Decision, and enforcement
There are three words to keep in mind when talking about Conditional Access policies. The three words are listed below in the picture.
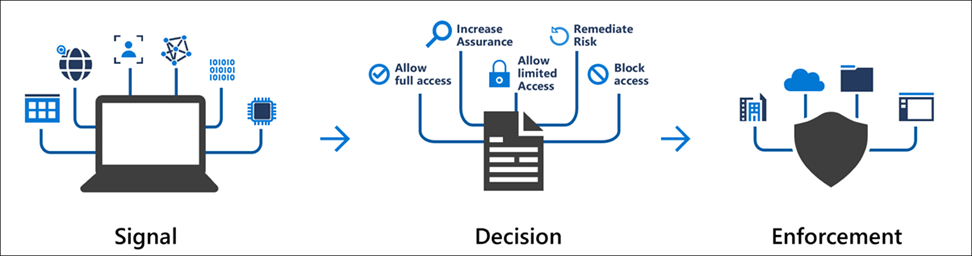
Signal can be many things, but some examples can be the user, your location, or the device you are entering corporate resources with.
A decision can be fairly simple, it’s making a decision if you are allowed in or not based on your signal, but it can also limit access and a lot more!
Enforcement is then enforced afterward, based on your decision. If the decision is that you are granted access, there are several policies available.
How do I create my first Conditional Access policy?
There are several ways to access the Conditional Access section in the Azure portal, but I always navigate through Entra ID (former Azure Active Directory) -> Security -> Conditional Access. Once you’re in the Conditional Access section, click on “policies.”
From this point, you have two options. You can either manually create your policy using the “New Policy” option or create your policy from a predefined template by clicking the “New policy from template” button. We prefer to create our policy from scratch, so we choose “New Policy.”
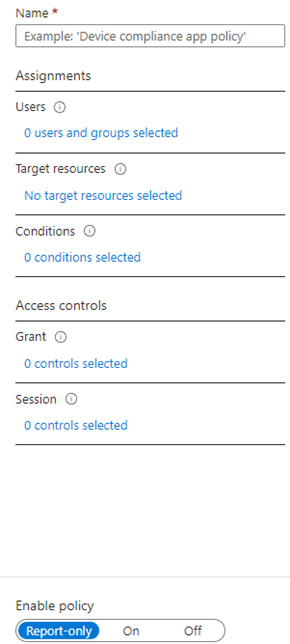
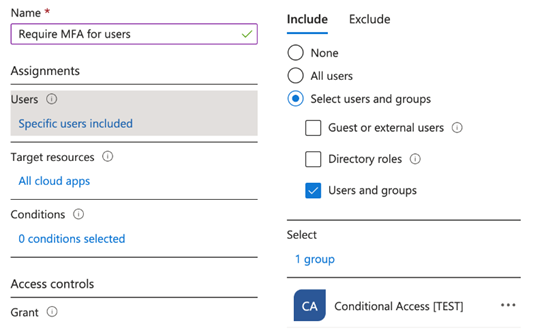
What kind of policy should we create? We can create a policy that requires Multi-Factor Authentication (MFA) for users. To start, we need to name our policy. I’ve named mine “Require MFA for users.”
The next step is to select your assignments. In this case, I choose the “Users” section, and I want to include a test group, so I select “Select users and groups” and pick my test group.
If you are including all users, we are including all users in the tenant. So, in this case, we will just test this policy with a test group. When you are including all users, the best practice is to create a new account that has the purpose of an emergency access account with a long password (longer than usual), grant it global administrator privileges, and then exclude this account. You might wonder, why would that be a good idea? The concept behind this account is to ensure access to your tenant in case you get locked out, or another issue arises.
From here, I can choose between “All Cloud Apps” or “Select Apps.” Selecting “All Cloud Apps” covers a wide range of cloud applications, allowing you to include a broad selection of apps. Alternatively, you can use “Select Apps” to pick a single application, you can also find apps from the “Enterprise applications” function in Azure in this section. For this policy, we will simply choose “All cloud apps.”
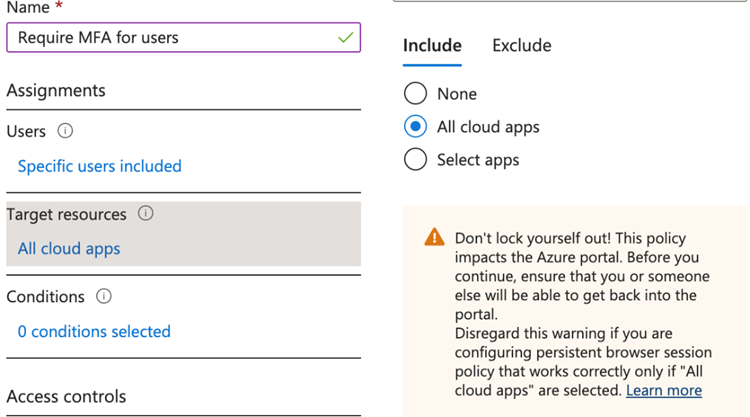
I have only assigned this policy to a pilot group with one test user (not my admin account), so the warning won’t impact me.
Conditions — Locations
Next, we move on to the “Conditions” section. Here, we can choose from various conditions. One that I’d like to briefly discuss is the “Locations” condition. We might have a scenario where we only want this policy to apply when a user is outside the office. In that case, we can create a trusted location using the public IP address at the company office and mark it as trusted.
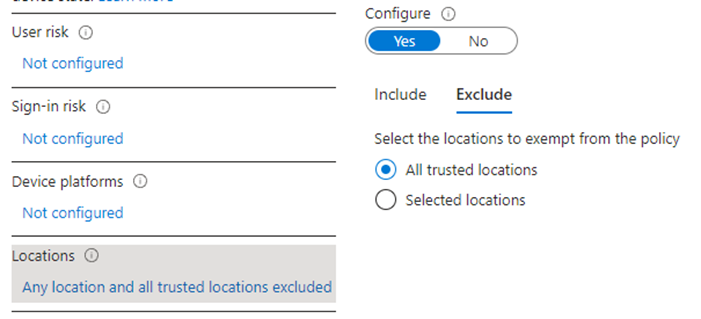
When that’s done, we can exclude this trusted location within the Conditional Access policy with the “All trusted locations”.
Conditions — Device Platforms
The second condition I would like to talk about is the “Device platforms”, from here can you choose which device type your policy should be applied to. You can decide to include “Any device” or “Selected device platforms”. As an example, can you apply Multi-Factor Authentication to users whenever they access corporate resources with Windows devices, and when they are accessing it with IOS devices they will be excluded from this policy.
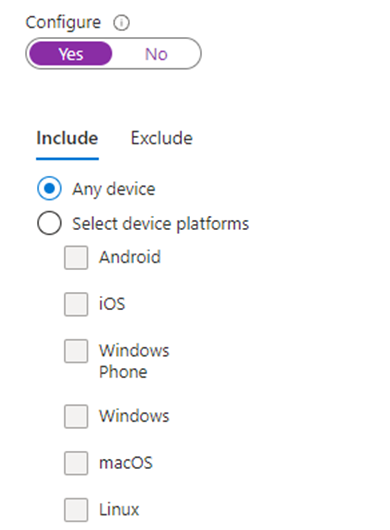
We’ll modify “Configure” back to “No” on both conditions (Locations and Device platforms) because we’re focusing on a simple policy in this blog, to learn the basics of Conditional Access.
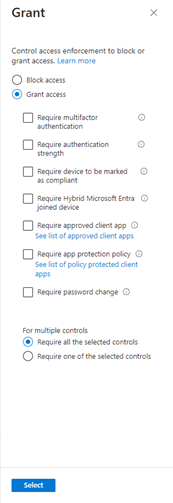
Going further down to the “Access Controls” section and going under the category “Grant”. We can from here make our decision, that we talked about earlier. We would like to grant access and require multifactor authentication.
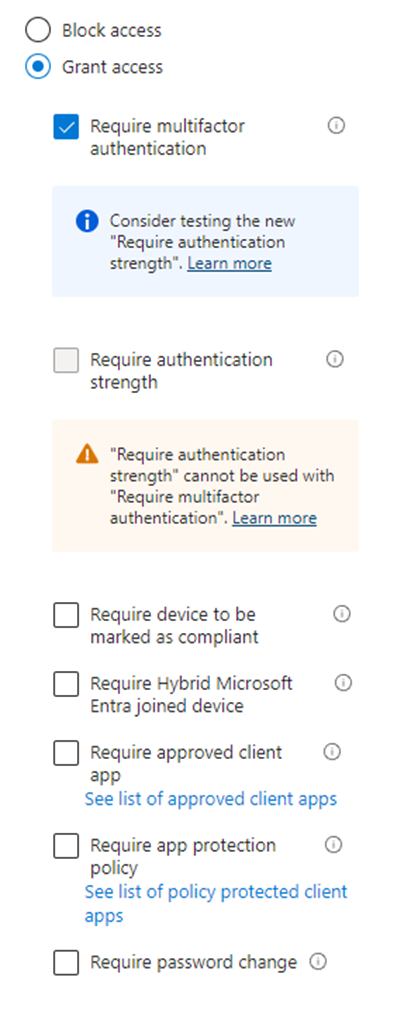
From this point, we are almost finished creating our first Conditional Access policy! There is one last section called “Session”, but we won’t cover that in this guide.
The last step is to choose whether the policy should be set to report-only, on, or off. The best practice is always to set the policy to report-only and wait a couple of days. This allows you to collect enough sign-in logs to check if the policy has worked as expected.
How do you test your conditional access policy?
After waiting for an hour, you can start checking the sign-in logs in Azure AD to see if your policy is working as intended. If you have a Log Analytics workspace available, you can utilize the “Insights and reporting” option in Conditional Access. However, in this case, we don’t have a Log Analytics workspace.
To access the sign-in logs, navigate to Entra ID (former Azure Active Directory) -> Users -> Sign-in logs. From here, you will notice that there are many sign-ins. If you select one, you will see a tab like this:
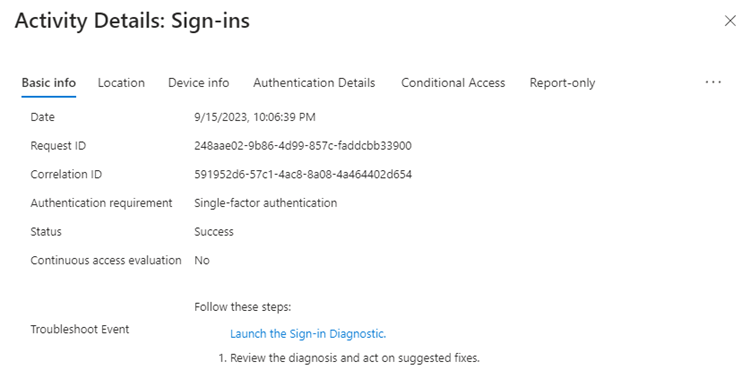
If you go to the “Conditional Access” tab, you can view all the applied Conditional Access policies. In our case, we can’t see anything there. If you proceed to the last tab called “Report-only,” you can see the policy, and the result will likely be “Report-only” For more detailed information, click on the three dots in the top-right corner and select “Show details.”
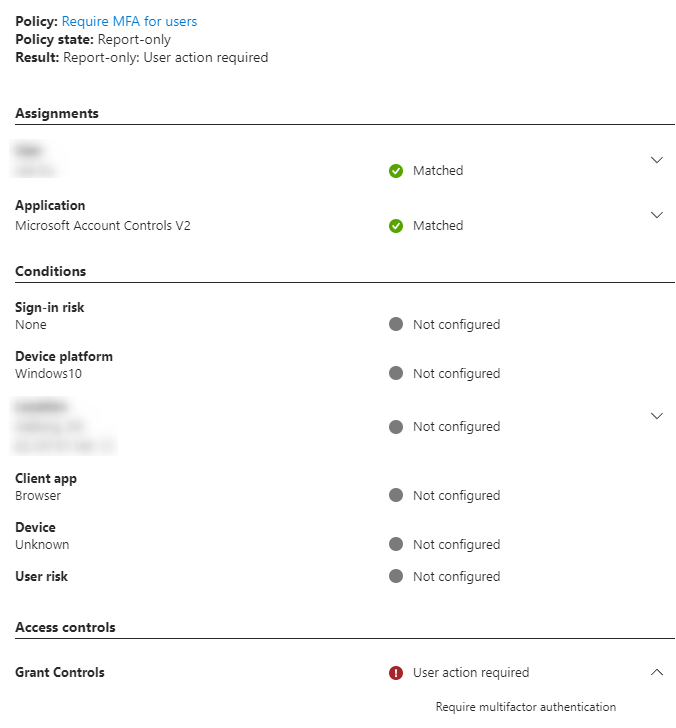
Grant Controls shows “User action required” and that it will require MFA if this policy is enabled.
Testing Conditional Access with What If tool
The “What if” tool included on the Conditional Access page is the last testing tool I would advise using.

“What if” is helpful, when you want to test your policy, to make sure it’s working as intended. I have selected my fictive test user “Alex Wilber” and selected “Any Cloud app”.
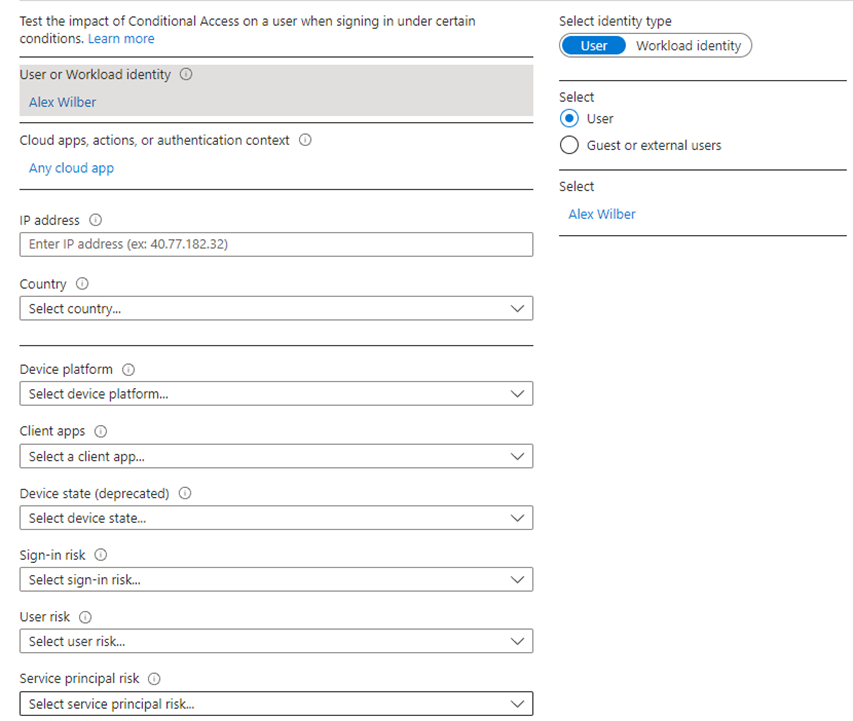
This tool allows you to test many different conditions, let’s say that we had a policy that require MFA for users when accessing corporate resources with Windows devices, while excluding all other device types. If we wanted to test if the policy is working, we could select Windows in “Device platform” and use the “What If” button.
We got on a sidetrack, but Conditional Access is exciting! Let’s get back to testing our policy. We didn’t use any conditions in our policy, so we only need to select a user that’s included in the policy, in my case it’s Alex Wilber.
A bit further down on the page, the “What if” button appears, let’s click on that to see what happens!
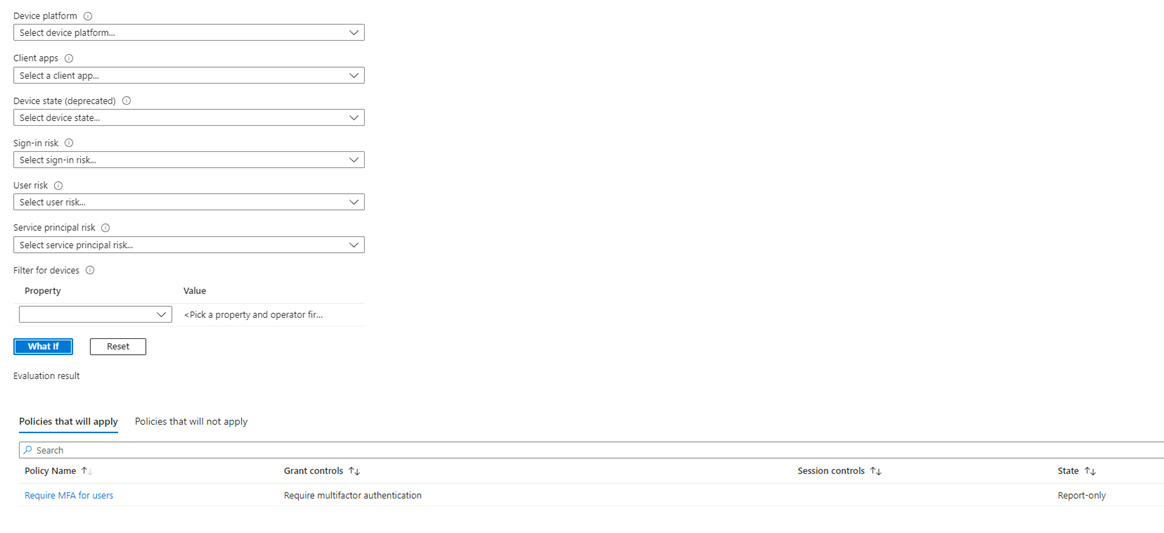
We can see that our policy will apply, and that it will “Require multifactor authentication” under “Grant Controls”. If the policy wouldn’t apply to these criteria, we have sat here, the policy would be in the other tab “Policies that will not apply”.
Conclusion
Thank you for reading my first blog, it means a lot that you took the time to read it. Thanks to everyone who gave me feedback, so I could learn from this experience.
I’m a part of the Microsoft Learn Student Ambassador program, which gives you many opportunities in order to build your technical skills, organize events, create blogs, and engage in communities.
Reach out to me, if you could be interested to hear more about the program.
#MSFTStudentAmbassadors